

Heyhoe
-
Posts
387 -
Joined
-
Last visited
Content Type
Profiles
Reviews
Discuss
Calendar
Store
Everything posted by Heyhoe
-
Round 1 KZ1 Video
-
The new "OK" engines which will be ran in 2016 will replace the current "KF" engine. Apart from choosing possibly the worst two letter combination for the name, we are eager to see what the future holds for these engines. They are direct drive (no clutch) so are fitted with a decompression valve to aid starting. The driver presses the valve to enable another person to push the kart, once some momentum is acheived, the valve is closed and the engine starts. Its very similar to how you would start a KZ kart with a hand clutch. This also means they do not require a battery, loom or starter motor so reduces weight. The weight limit has also been reduced to 145kg which we think is a very welcome change. They still have a manual power valve but apart from that, they are much close to the direct drive classes of old. Additionally, manufacturers have committed to supplying the engines for, and I quote the CIK, "Around 2000 euros" What this will mean in the real world here in the UK is not yet clear. This price includes "all ancillaries", we assume this means the ignition, carb and exhaust. Here is a video of Rick Dreezen showcasing the IAME OK engine at PF International. With the new weight limit and relative simplicity of the engines, we are eager to see what this class brings. On paper, they appear to have made the right decisions but only time will tell. If IAME, Vortex or TM are reading, we would love to have a go to give our thoughts! (wishful thinking)
-
KartSim, which is a karting simulator game has been in development for 6 years! There have been many times over the last 3-4 years that we thought this project might have been dead in the water. However, they have recently announced the biggest news so far with a total re-branding of the game and development company (formerly Zach Griffin) Black Delta. Official announcement from Black Delta They have also announced backing from several top names in karting including FREEM, Alpinestars, CRG, IAME, MIR, Sparco, Arai, and Arrow. There is once again, not much in the way of in-game footage so here is a very early Alpha testing video which should give you an idea. We are just praying this game lives up to the expectation.
-
The "E" plate meeting held at Shennington last month. Good grids and some excellent racing! Unfortunately none of the Kart Review guys could make the meeting due to other commitments in July. Part 1 Part 2 Part 3 Part 4 Part 5 Part 6 Part 7 Part 8
-
Two rounds later and I have finished 14th and 13th in the finals. Neither meeting went well with a DQ in a heat at Forest Edge and shocking starts at Rissy! Pace is OK, need to see what Rowrah brings.
-
This was posted on facebook the other day and can be very useful if you are just starting out karting. Some good advice on weight/seat positioning.
-
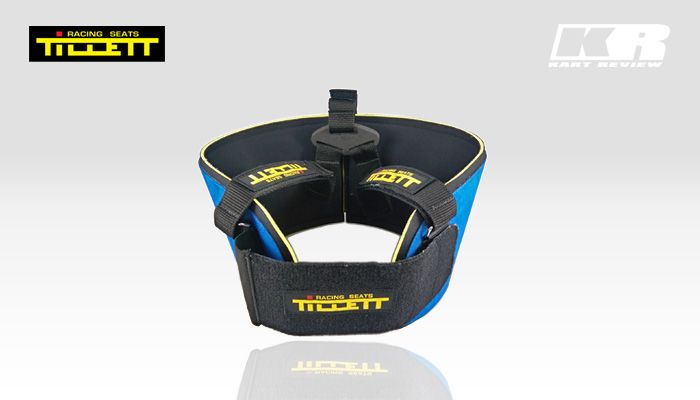 Introduction New for 2015, the Tillett P1 is Tillett's top of the line rib protector. Here is what Tillett say: The rib protector is available in Blue, Grey and Red. Today we have the blue variant and we think the Blue is the best colour, obviously. Tillett are a well respected seat manufacturer and have been making Rib protectors for a good few years now. Their Ribtec series gained huge popularity and are the best selling rib protectors in the UK. First Impressions Let's be honest, this rib protector looks cool! The suede material used on the outer shell really polishes off an already excellent design. Here are a few images of the protector. The protector is made up of two panels on each side. These panels are attached by a patch at the rear sporting the "P1" logo. This patch uses ultra strong Velcro to align the two panels and keep them in the correct position. The two panels can be angled to suit different body shapes and once set, should be left alone. The shoulder straps connect to the patch using a simple foam connector. There are no solid plastic parts here so the protector retains its comfort. The usual Velcro shoulder straps are used and again, once set should not be altered. The main chest fastener has elastic built in and stretches across to a Velcro pad on the opposite panel. It is available in sizes; Cadet, Extra Small, Small, Medium, Large & Extra Large. As with all items of clothing/safety equipment, we recommend you try this on before you buy it. Better still, go down to Tillett and have them set it up for you properly. Metal loops are used to attach the shoulder straps to the front of the protector. The P1 Logo on the rear is a really nice touch. In Use Observations Our on-track observations will follow. Summary This rib protector is all about comfort. There are no protruding buckles or fasteners, and such is the thickness of the protector it sits inside your race suit with minimal interference with the karts seat. The protector is right at the top of the line in terms of quality and performance, but also in price costing £158 + VAT. Pros Excellent Comfort Excellent Performance Styling Adjustability Size range Cons Price A brilliant piece of equipment from a manufacturer with proven credentials. Simple design and simple results.
 -
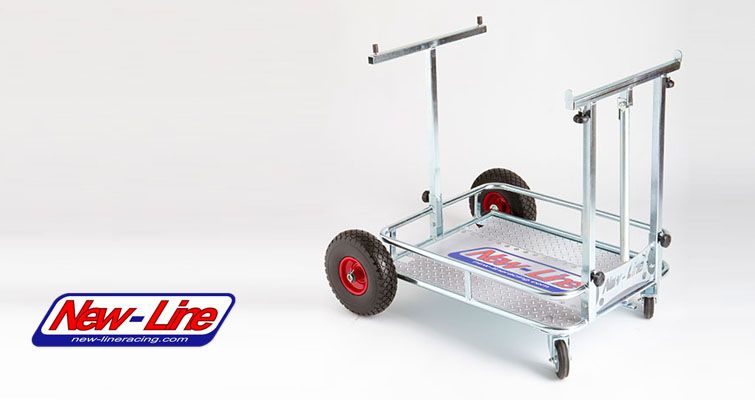 Introduction Paddock areas in the UK can vary from ultra smooth tarmac at one circuit, to rocky hillsides at another. We don't think there will ever be a trolley which will perform perfectly on all surfaces as there has to be some compromise. If you are looking for a trolley to use as an all-round trolley, you need to go for one with large “off-road” tyres. There are several options available each with their own drawbacks. We think the best compromise is the 3 wheel “Super Trolley” offering from Dartford Karting (£149 exc VAT), Link: http://www.kartstore.co.uk/shop.cfm?cat=1709&node=266 . It will be able to handle the rough paddocks as well as the tarmac ones. It may not be as maneuverable as a 4 wheel, rear steered trolley but this is the price you pay for an all-terrain trolley. Being able to handle the terrain is obviously the most important job of a kart trolley, but there are many other aspects which are important to consider depending on where you are racing, and even what level you are racing. If you are racing at the very top level, you need somewhere to keep your tools for wheel changes as well as last minute adjustments, so a floor tray on the trolley is a must. This isn't to say you don't need a floor tray at other levels of competition as having your tools with the kart can be very useful for those last minute weather induced changes etc. At most levels of competition, you are in possession of your wheels and tyres so when the weather is looking a little iffy, it's handy to have somewhere to put your wet tyres on the trolley to save carrying them down separately. If you are a heavy driver and you are racing F100, chances are you will be able to get away with any trolley available and not have to worry about its integrity. On the other hand, if you are a light driver racing a gearbox kart with 20+ KG of ballast, the trolley is going to take a lot of punishment, so choosing a trolley which is up to the job is important. Smaller drivers and mechanics may struggle to lift the kart on and off if the trolley is too high, so you may want to go for a trolley which is lower to the ground. These are just a couple of examples of features you should consider when buying a kart trolley. Are they important to you? Build/Observations With the above in mind, the New Line Trolley we are reviewing today is a trolley which is aimed at smooth to moderately uneven paddocks. At £162.50 Inc VAT, this trolley is well below the price point of it's competitors so we are interested to see how it performs. Packaging is basic with little in the way of protection. The trolley folds down into itself and when opened, is secured by three nuts complete with a plastic knob. This mechanism is really well made and once the uprights are bolted into place, the whole trolley feels rock solid. On the rear of the trolley there are two uprights apposed to most trolleys which only use one. This is ideal for karts which have all the weight on one side or which have a particularly heavy engine setup. Once the uprights are in position, you are required to fit the front axle and wheels. This is done by sliding the separate axle into the tube and locking in position with a button head bolt. This goes through the axle into a captive nut in the middle of the trolley. Once the axle is secure, you can fit the wheels. The method of holding the wheels onto the trolley is simple, but has the potential to wear out the plastic collar if the wheel has repeated side loading. This is an area which could be improved. The wheels are metal, with needle bearings in a plastic cage. The tyres are the solid "foam" type but seem much stronger than some of the tyres we have seen on trolleys in the past. They coped with a 100kg kart no problem. Over time, these may lose their shape if the kart is left on the trolley but we can't comment on that yet. It's now time to fit the small rear castors. They are held on by three button head bolts and have a 4mm steel reinforcing plate attached to the floor tray. This plate stops the castor bending the floor tray which can lead to the castors not working as they are intended. One of the castors comes complete with a brake! This is an absolute god send for some circuits such as Rowrah. We have all had a trolley which decides to run off once you have lifted your kart, or a trolley that won't stay still when you are trying to lift your kart back on at the end of a race. Top marks to New-Line here for the inclusion of a brake. If both castors were braked it would be even better as the trolley could pivot on the one castor, however one brake seems to do the job and also keeps the price down. The last job to complete the trolley is aligning the chassis cups. This is one of our favourite features of the trolley. Some trolleys come with V shaped grooves which can sit against your chassis and cause unwanted damage. These chassis cups are perfect and will not cause any damage to your chassis as they are made of of nylon. The cups hold the kart snug and because of the double uprights on the rear of the trolley, the kart feels really solid. At the front, two pins will stop the waist of the chassis from moving side to side. These are not adjustable but were just the right width for an OTK chassis. They are not too high to foul on the brake master cylinder either. There is more reinforcement underneath the trolley with some rectangular steel section spanning the length of the trolley. Removing the white protective paper reveals the trolleys floor tray complete with sticker. The sticker has a panel to stick on your race number to easily identify the trolley but we are not sure it needed to have the words "Factory Driver" on it. It may appeal to some but to us "Driver" would have been enough. Maybe this is something that does not translate from Italian to English properly, we don't know. General Use The biggest thing that grabs your attention when using this trolley is its stability. We think this could be the most stable four wheel trolley (of similar design) out there by some margin. The trolleys footprint is wider than the average trolley which adds even more stability. One thing that was immediately obvious after placing the kart on the trolley was how low the kart sits. This does mean that working on the kart is a little more difficult but once again means the trolley is ultra stable. Here you can see it is around 2 inches lower than a Senzo 4 wheel trolley. We can also see the handle at the rear of the trolley which is long enough to protrude from the rear bumper, unlike many trolleys such as the OTK trolley and the Senzo trolley which are too short. Summary If you are looking for a trolley and race at circuits with a decent hard standing in the paddock, you will be hard pushed to find a better performing trolley for this price. It's a rock solid trolley for the heavier karts and glides around with ease. The brake makes issues on the dummy grid a thing of the past and the chassis cups are one of the best methods of holding the chassis out there. It's ideal of you are smaller than average or struggle to lift a heavy kart on to the trolley. This may be an issue if you have a really tall mechanic, but for most will be a welcome feature. Pros Price Stability/Strength Maneuverability Long handle Braked castor Lower for easier kart lifting Floor tray for tools Cons Height could be an issue for taller mechanics No spare wheel spikes Wheel holding method basic We are struggling to find any real cons with this trolley apart from the obvious which is it will be no good for rocky paddocks such as GYG etc. It's price compared to similar trolleys of lesser quality is it's biggest selling point. Lack of tyre spikes is disappointing. Overall, an excellent product. The trolley is available from Eurokart now! http://www.ebay.co.uk/itm/NEW-LINE-KART-TROLLEY-KZ-ICC-125-OPEN-250-NATIONAL-OTK-/121630437080?pt=LH_DefaultDomain_3&hash=item1c51bd2ed8 NOTE: The floor tray sticker on the official photos is different to the one we received. We also noticed the spacers holding the two steel tubes together are rectangle on the images but small round bar on the item you receive from Eurokart. This is just a modification and does not effect how the trolley performs.
 -
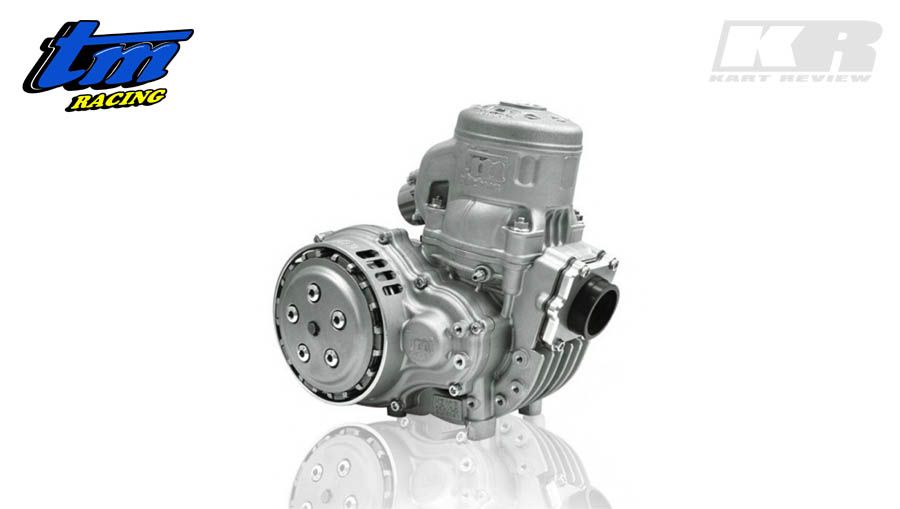 Introduction 2015 saw two of the Kart Review drivers move to the KZ class. We attended a few meetings to gauge which engine was the one to have. Possibly the most expensive item you will buy in karting, we did not want to rush into buying something that was going to cause issues further down the line. There are many engines available including options from Vortex, Parilla, Modena and Maxter to name a few. The one that stood out at meetings in the UK was the TM offering, the KZ10B. This engine is dominating grids and usually makes up 65% + of UK grids.That's not to say it's ultimately the "Fastest" but it enjoys excellent track side support, particularly from Andy Fairless Racing (AFR). With this in mind, we decided to buy two brand new engines from AFR. These engines are not the standard KZ10B and are tuned by AFR. It has got all of the options fitted apart from the 22mm crank option. According to Andy at AFR, the 22mm crank does not offer any particular performance gains. We will take his word for it! If you browse the web looking to buy this engine you will find a host of different "specs" and option packages. It does get a little confusing when you are not quite sure what you are after. The benefit of going through AFR is that he will not sell a standard engine, unless you specifically ask for one. He orders in the engine spec which sees maximum on track performance at the best price. Some of the options available online come with carbon exhaust silencers etc which don't really offer any performance gains, they just increase the price. As we are limited to what we can review on engines due to our limited testing capabilities (Dyno etc), this review will focus on the day to day running of the engine and less on the performance. That said, this engine is by no means slow, it's right at the front of Super 1 this year and Super 4 alike. First Impressions We received the first engine at Shennington KC for an MSA club meeting. Unfortunately this coincided with preparing a new kart so time was of the essence so we struggled to get many good images of the engine. Engine comes complete with mount, carb, pump, sprocket, expansion chamber & silencer. Everything you need essentially. The engine also comes complete with the fuel lines configured correctly. The exhaust looks stunning when it's new. It's TIG welded by hand out of mild steel and looks the nuts! This won't last long though as once it has had a few heat cycles and has been ran in the wet, it soon bronzes up. The engine fitted to a Tonykart 401 with no real issues. The gear linkage bar was not required to be bent using an OTK size 2 seat. We did have to kink it slightly to fit a size 3 OTK seat though. The engines comes with a clamp which is designed for 32mm diameter chassis rails so we found that the clamps dug in to the powder coating. It would be worth running a clamp designed for a 30mm chassis but we have not had any issues with the engine positioning so far. You will also need to run an OTK rear clamp if you are fitting to an OTK chassis. We did find the engine could not be slid as far back as we would have liked as the engine clamp hit the weld were the sidepod bar is attached. This appears to be more of a fault with the chassis though as the second engine fitted fine to another new OTK chassis. You will have to modify your right hand seat stay to avoid contact with the exhaust silencer, we did this by using a ball pein hammer and a tow bar! We used the OTK adjustable seat stay on the second chassis which worked really well without any modification. Possibly the only time I will ever have a brand new chassis complete with brand new engine! General Use / Observations I have used the engine for around 8 hours now and had a new piston at 4 hours. This cost £80 including fitting at AFR. I have also had two new clutch plates at £6 each. I change the gearbox oil after each meeting which works out at about £7 per meeting. The engine will get a bottom end re-build after 10 hours which costs around £310. At this point you may as well put in a new piston too, so you are looking at around £380-£390. KZ Re-build costs AFR: 4 Hours: Piston £80 8 Hours: Piston £80 10 Hours: Bottom end re-build + Piston £380 Total: £540 Total after 15 hours: £810 This is without a con rod or crank so obviously if the engine requires these the price will increase. Around £150 for a connecting rod. Rotax Max Re-build cost OGDEN Motorsport: 15 Hours: Full Re-build £800 This is obviously not a comprehensive re-build schedule but it goes some way to comparing the costs of KZ to more popular classes in the UK. When you fit the exhaust silencer, make sure it is secure and cannot rotate easily. Keep your eye on this after each session as if the silencer spout faces backwards onto your rear bumper, it will blow a hole right through it. Generally, apart from the things mentioned, I have had no issues. I was expecting the engine to be a bit of a pain to have running correctly all of the time. I was wrong, the engine starts first time every time as long as you remember to blow your fuel through! On track I have not experienced any problems. The gear change is very positive on the up change, and as long as you keep your foot off the throttle the down changes are equally as positive. One huge thing that has helped both drivers get the most out of the KZ10B is the excellent trackside assistance from Andy and Sue Fairless. If you ever have an issue or a query relating to the engine, you can bet your bottom dollar that they will be able to sort you out. This for us was a major factor in choosing the TM over the Vortex engine. They attend all Super 1 & Super 4 meetings as well as lots of club rounds in the UK. This is not to say that other engine manufacturers do not have good track support, but for us the TM just made sense. Engine in action... Summary Having two drivers with limited knowledge of the KZ class, it was important that we were on track as much as possible. The TM engine has the best turnout in UK grids and therefore excellent spares availability and support. The engine is proven in Super 1, as well as at European and World championship level. I would advise that anyone looking to purchase this engine gives Andy at AFR a call. They are very busy so they may need you to call them back. They really know what they are on about so don't be afraid of asking questions if you are unsure about anything. AF Racing: 01539 562256 Pros Excellent performance Excellent trackside support Good reliability Cons 32mm Engine clamp (not really a con, but we can't think of any others!)
 -
Last month was the first time I have actively been involved in a Super One meeting. I was Paul Sleight's mechanic and he was running in KZ1. The Friday was rather busy with things like stickers having to be applied to the kart in a particular way, as well as race suits having to be handed in to have the sponsors badges sewn on. All very nice for the cameras. Saturday was much better though and I can honestly say I have not been so relaxed at a race meeting. The Parc Ferme is not a huge deal and actually helps when the weather is changeable. It means you can get down next to the circuit, see what it is doing and then decide which way to go with setup. The fact the meeting is heavily timetabled also helped. There was no rushing around to see who was out on track and gambling on whether you had enough time to make some changes. The officials were surprisingly accommodating. I had imagined they could be hard work but they were very understanding and helped out when they could. I didn't feel I was inconveniencing them if I had a question about the format of the event which you can sometimes feel with officials at certain circuits. Especially when you are new to something One thing which was a little frustrating, was the feeling that the event is all about the younger drivers and the "Teams". I understand that this is probably the image that they would like promoting as some of the team setups etc are impressive to say the least. I think this is a reflection on karting in the UK in general, which very rarely sees senior karting promoted. The KZ1 class is the MSA's "British Karting Championship" which means it's THE class. But, as the grid is made up of some older guys in much smaller teams or as privateers, does not enjoy the spotlight as much as some of the Rotax classes. You only have to look at the "Drivers Parade" in which all the privateers are sent to one end because they don't match! Privateers end of the parade Opposite End In my opinion, these are the guys who should be given the exposure, showing that you don't need a tonne of money to fill a teams pockets. Currently, people look at an image of the drivers parade and think "Look at all that money, I could never compete with that". Overall though I really enjoyed the event. If you are contemplating competing in Super 1 and can afford the extra outlay, I would definitely recommend it!
-
I'm sure it's not just me that's totally losing interest in F1 recently. What do you think the main reasons are? Here are a few I think could be contributing. Mercedes DominanceEngine regsCircuits/Circuit safety (Large run-offs, no real punishment for pushing too far)Media Coverage (Trying too hard/too in-depth?)These are just a few that come to mind. I'm sure there are many more. One of the main issues for me is the lack of punishment to drivers for going beyond the limits of the car. All of the drivers go out in practice and keep going quicker until they start running wide at each turn. They then know exactly how hard they can push with the current car configuration/setup. My issue is that this can really take the control away from the driver and put much more emphasis on the car. I realise the driver still has a large part to play but I cannot help but feel that all the drivers on the grid are already maximizing the car underneath them. It's then down to the team to tweak aero, setup etc to find a few more tenths. If we still had a gravel trap at the edge of every kerb, the drivers would have to take much longer to find the limit of the car and hopefully this would still be happening by the time they race, thus rewarding drivers who can find the limit quicker, but also punishing drivers who push that little too hard. No drivers want to be stuck in the garage while their mechanics replace the floor on their car! I understand there is always an element of the driver knowing how hard to push as the circuit is always evolving and the car reacting differently the changing conditions. But again, if they are not punished when they get it wrong, they lose a few tenths, or half a second. If they ripped the front wing or the floor off when they get it wrong I think we would see many more driver effected races etc. Your opinions?
-
A year later and it looks as though X30 is finally taking over from Rotax! The numbers at clubs are repeatedly beating those of Rotax. Let's hope the success continues and we don't see any issues with the engine in the long term.
-

Super 1 - Round 1 Rowrah - Mini Max; Junior Max; Senior Max; Honda; Iame; KZ1
Heyhoe posted a calendar event in MSA Super 1 Championship
untilSuper 1 - Round 1 Rowrah - KZ1 -
Well the first round is over... I manged 10th in the final which is more than I expected! next up Forest Edge....
-
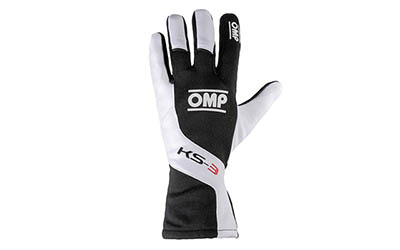 Introduction If you are anything like me, you will struggle to come up with any suggestions to give to family at Christmas & Birthdays. You could ask for a new helmet, or a new suit but realistically, most of our family do not have that kind of cash to spend on gifts. As such, gloves are a perfect gift idea! The gloves we are reviewing today are at the lower end of the “Branded” race wear spectrum. OMP is a well established and well respected manufacturer throughout the motorsport industry. At £27 inc VAT, they should not break the bank, even for the tightest of racers out there! My last pair of gloves were the Alpinestars Tech 1 KV, when I purchased them a good 4 years ago they were top of the line gloves (around £60 if I remember correctly). I am very happy to get 4 years out of them, but in truth they have needed to be replaced for at least a year. With that in mind, I didn't quite know what to expect from a much lower priced glove. First Impressions The first thing you notice compared to the higher priced gloves is the material, or more specifically, the variety of materials used. These gloves are pretty much constructed of the same material throughout, as opposed to the more premium gloves which have areas made with specific materials for breathability, durability and comfort etc. I have always thought this was a little bit of overkill however, as I have never even thought about the condition of my hands when out on the track. I have never been half way down the straight and thought “Crikey, my hands are hot!” or “I'm so glad I have these special grippy nobbles on my palms, otherwise the wheel would have definitely slipped out my hands on that last bend..” The thing that is most important for me, is the thickness of the material. I want to be able to feel everything the kart is doing, without anything dampening the feeling between my fingers and the kart. If you have ever tried the wet suit style gloves, with a current style OTK wheel you will know what I mean. It feels like the wheel can move using the padding/sponge in the gloves and wheel and you don't have full control of the wheel. These gloves feel nice and thin and don't add any excessive padding to the feel of the steering. They do have “grippy” sections on the palm in the form of a gel type coating but it's not over the top like some gloves The gloves have the OMP logo placed in various locations, just in case you forget who made them. They also have the word “karting” on the palm. I understand manufacturers adding useless logos and some text here and there to promote the product and add a little style but I'm not sure “Karting” was really necessary. It just seems.. pointless. When worn, the gloves are relatively comfortable but have stitching on the inside, as opposed to the higher end gloves, which have most of the stitching on the outside. This is definitely less comfortable. However, as I mentioned previously I'm not convinced you will notice on track. One final point to note is there is no Velcro strap to tighten the gloves around your hand, meaning it is important to get the correct size to fit you. General use/Observations as of 30/05/2015 After using the gloves for around 3 meetings and a 1 hour endurance event, there are a few things I have noticed. The thumbs on these gloves seem a little long, the glove fits well on the palm and the finger lengths, but the thumb has about 7-8mm of material at the end. This does not effect the performance of the glove but it does get a little irritating as it can affect dexterity while trying to open a helmet visor for instance. Another small issue is the elastic "waist" of the glove. This has came un-stitched so no longer provides the same fit. This is a shame as I really like the feel of the gloves on track. Summary Some karting gloves can really go over the top with the design. This can sometimes, in my opinion, make the feeling a little numb when holding the wheel. The OMP KS3 gloves are no nonsense for the most part and provide a consistent, positive feeling on the wheel. They are very well priced (£3 cheaper than the nearest rival, Sparco's KG3 gloves) Pros Well priced Satisfying feedback from the wheel Simple Cons Stitching on inside Less premium materials Stitching quality Ill fitting thumbs
 -
-
Its the first meeting of the championship next weekend. I will be doing the full weekend along with @TheDoctor running on the Friday. Cannot wait!
-
This is on my shopping list!
-
We hope you like the changes! As well as fully supporting mobile, the system is much more advanced and brings the site up to the highest standard of community based software. Our next project is to implement a fully featured Classifieds system. This will allow users to control all of their adverts as well as uploading multiple images. There will also be added security as we will require some security questions if you are planning to sell on the classified part of the site. This should hopefully go some way to stop thieves operating. We cannot guarantee this, but the alternatives currently don't offer much in the way of protection to buyers.
-
The upgrade is well under way now and we hope to have the site to an acceptable level by the end of the weekend. There will be enhancements being added for many weeks/months to come. Some of these will be changes not visible to visitors, but will be to help the guys with writing the reviews.
-
We have ran into a few issues with displaying reviews properly. Please bare with us though as the improvements are well worth it.
-
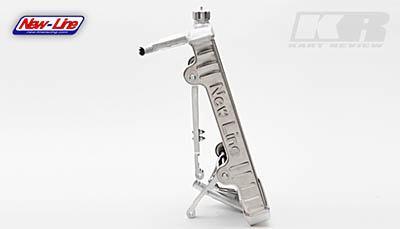 Price breakdown Radiator & Mounts: £342.00 Inc VAT Blind: £64.80 Inc VAT Total: £406.80 Inc VAT New-Line is the brand to go for if you are looking for a top quality radiator. They cater for all classes with radiators of varying styles and sizes. Today we are looking at the RS model which will be used on a KZ2 kart. The radiator is marketed as an all year round radiator so should hopefully cope with the ever changing British weather. I'm eager to see what the quality of the radiator is like as it looks as though they are now pressing (forming) some of the components which used to be more substantial. First Impressions My fears over the strength of the pressed parts were put to rest straight away as they are made of a substantial thickness aluminium sheet. The radiator feels sturdy and well built. The radiator mounts are really nice and have lots of scope for adjustability. We ordered a radiator blind as we think these are a great invention and allow infinite adjustment of the airflow going through the radiator. The blind is made out of two laser cut stainless steel profiles with a aluminium bar at the top and bottom connecting the two. The actual blind runs on pulleys and is clamped to the rubber O ring rail. I was a little dissapointed with the stainless steel side profiles as they had sharp edges and one even had the protective plastic still attached. A little more attention to detail on this kind of stuff could go a long way. I also noticed that the handle on the blind had a really large burr (sharp edge caused by cutting method) on it. This was sharp, and given its the part you actually touch is not really acceptable to neglect this area. General Use/Observations The quality of the welding and polishing are more function over form. You can tell the radiator is hand made, in Italy.. I see a fair amount of aluminium TIG welding at work so know how much effort has to be put in to achieve a decent looking weld. In my opinion, given that these radiators are made on a jig and are the same parts welded all day long, a neater weld should be being produced here. There is nothing wrong with the weld but you get the feeling there is not a great deal of effort goes into it. Many of the components have been welded together and the weld polished away, these look a little untidy also. I have no doubt that the construction will be strong enough for its application, more than enough, but when you are paying a premium for a product you expect you see this in the workmanship. The radiator mounts on the other hand are excellent quality. It is all CNC machined and finished nicely. There are no sharp edges or defects from what I could see. The mounts allow sideways movement by loosening the cap head bolts. This is much quicker than the previous method of changing a hole to move the radiator, but does open up the possibility of the radiator moving whist in use. The inlet and outlet bores seem rather large. Standard 16mm internal diameter water hose (standard black water hose) is very difficult to get on and off. This makes it difficult to drain the radiator at the end of the day. The kit comes complete with all mounting hardware to build the radiator and attach the blind. This part is used to hold the mounts to the radiator and is typical of the finish (or lack of) of some parts. You don't however get any parts to attach the radiator to the chassis. I assume this is because of the number of various chassis mounting methods. You get a really nice machined radiator cap with built in seal and pressure release valve. Again, the actual machining is a little rough but the marks have been polished out and buffed to a mirror finish. This kind of treatment does suggest they are covering up some poor finishing or machining methods but the item is definitely up to the task. New-Line also include a catch tank with a proper mount. A nice little extra which many manufacturers would omit. They could have given us a few inches of fuel hose though... Cheap skates. Summary With New-Line products, you are paying a premium for these as they are hand made. They are solidly built, but with a little more care could be a stunning product. Ironically, the best part of the package is the mounting hardware, which are totally CNC machined. At the end of the day, if you look past some of the workmanship (which is actually nitpicking), this is a really good product which performs as expected and will not let you down. It does what it is designed to do extremely well and for that, we can't really mark it down too much. I think I could actually drop this radiator and it would survive, which is something you would not try with many radiators. There are some negative comments in this review, but these are small issues which really do not impact on the performance of this item at all. It really is a fantastic piece of hardware. Pros Excellent performance. Solid reliability. Extremely adjustable. Cons Expensive. Poor finish on some parts. Limited availability in UK. If the finish on some parts was just a little better we would have scored it higher.
 -
 Brand: AirTek Design Price: £375 Base Price We all want a custom paint job, but rarely have enough spare cash to drop on something that will have zero effect on our performance. We took the plunge so we could bring you this review and help you make an informed decision on which painter to go for! Obviously there are lots of painters out there and we hope to review more of them in the future. Before we go on, I would like to give you an idea of where this service sits cost wise. Using the below design as an example, you would be hard pressed to have somebody attempt this for less than £150-200. Even guys who paint as a hobby would want this kind of cash as the man hours required to produce something like this are so great. And for this price, the chances are the experience will be low and thus the final product will not be up to standard. So, for £375 you would expect a good quality paint job. There are painters out there which may be technically more adept, and maybe take longer on the attention to detail side of things. These painters however will be charging £800+ for this paint job, many over £1000. AirTek Designs sit somewhere in the lower/middle area of the cost scale at £375 for this particular job. Design Knowing what you want from the painter is 90% of the battle here. If you try and verbally describe a design in your head to the painter, chances are, they will not build the same image in their head. I would highly recommend you find some examples of work you like. This is by far the best way of getting the message across. If you are handy with the old crayons, draw ideas of what you want. Anything more advanced than stick men and I'm useless so I decided I would use examples which already existed. I chose a Roman Grosjean design which if all else failed, and the painter produced it, would still look fantastic. Here is the image I provided. I also left this with Carl to give him a good idea of the blue colour I wanted. This is a bodyshell I had painted by a guy over in the US. Side note, if you run out of cash to go karting, give RC Racing a try, its just as competitive but on a physically smaller scale! Check out rctech.net for all the info you would ever need. Now that I had a visual aid, I could go through the helmet design, detailing which colours I would like, and the location on the helmet I would like them. AirTek offer a computer designed mock-up service, for £35. If you go for this service, it allows you to see what the helmet will look like once it's finished. This means you can highlight any areas which you would like altering before the painting commences. This can really help if there is something large which cannot be changed once the painting has started. Some examples of the computer design service At the time, I decided I would not need a mock-up. This was mainly because I'm a bit of a tight arse and secondly because Carl really seemed to understand what I was after. That said, if I was to have another paint job, I would 100% have a mock-up designed. It's a no brainer really, especially if you have something very specific in mind. A mock-up would have stopped any apprehensiveness I had over the next two weeks! Painting Process Once Carl had produced the base design, he sent images to make sure I was happy before he went any further. There was a few areas I was not totally happy with and Carl re-painted these with no hassle. Don't be afraid to ask if something can be changed as it may be an easy fix. If you don't do this, you will spend years with a helmet you are not happy with. Obviously if the design is totally wrong and way off what you were expecting, then a re-paint is a major set back, and could cost you a lot of money. This is where the computer mock-up is worth it's weight in gold. Luckily though, the design was coming along nicely once the small alterations had been made. Carl sent photos to confirm before he added the final touches and the clear coat. I was starting to think that the overall look of the helmet seemed rather dark. This is because a large area of the helmet is taken up by the visor, which is removed for the painting process. Keep this in mind when you see images of the helmet half way through. It was then a case of waiting to see what the finished product looked like. I decided not to see any pictures of the finished product and to view in in the flesh. First Impressions The first impression I got when I first saw the helmet in the flesh was "WOW". The overall look of the helmet is brilliant and just what I was after. Images really do struggle to do the helmet justice as light movement plays such a large part in the overall look. Below are Images of all aspects of the helmet, (7 images below) Observations When you get up close and personal with the helmet, there are a few imperfections, but nothing you would not expect. I will not go into these as they are so minor and don't effect the look of the helmet in the slightest. You should bear this in mind when getting any kind of custom paintwork carried out. I would bet even helmets in the F1 paddock have small imperfections, it's just the nature of the beast. The clear coat is lovely, there is no orange peel and it has a really nice flat high gloss shine. There are some areas which possibly need a little polishing but again, I'm being very picky here! The union flag on the top of the helmet is gorgeous. I didn't want a blocky bold flag on the top, but more of a subtle faded flag. This is exactly what I got and possibly my favourite part of the paint job. The names on the back and the small name on the top of the helmet came out really well. These didn't actually cost extra and were deemed to be simple enough to be included in the base price. Summary If you really want a custom paint job but don't wish to drop the best part of £1000 on one then AirTek is a very strong contender. Their work is excellent so you should not feel like you are settling for a lesser service. I honestly think the helmet is all the proof you need of that. And it looks better in person! I should mention at this point that AirTek did not know we would be reviewing their service so what I experienced is how all the customers are treated. There was no special treatment. The process only took two and a half weeks from me dropping off the helmet to completion. I never felt like Carl was rushing any decisions and had plenty of time to chat when I went to visit. He often has helmets which are at various stages of completion that you can look at to use for ideas. All round I am extremely happy with this service, and these types of service are possibly the hardest to gain customer satisfaction. I would not hesitate in using AirTek in the future. If you plan properly and make certain Carl knows what you want, you will not be disappointed in the finished product. (Get a mock-up!) The paint job cost £375 + £25 for the spoiler to be painted. AirTek can supply helmets and accessories (Spoilers etc) from various brands for very competitive prices. I suggest you give them a call and see what they can do. Visit their website for more details: http://www.airtekdesign.com/ Pros Competitive Price Excellent Quality Flexible with design during painting Great Customer Service Cons Images provided on progress are not great. Better Camera/More light required
 -
2015 KZUK Championship Dates: March 28/29 Glan Y Gors May 2/3 Forest Edge August 1/2 Rissington August 29/30 Rowrah September 26/27 Fulbeck October 10/11 Kimbolton Get these dates in your diary! Entry forms available on www.northernkartingfederation.co.uk in two weeks time. ---------------------------------------------------------- Sending my entry next week
-
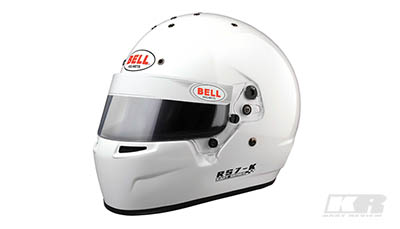 Snell K2010 approved, this latest offering from Bell is designed specifically for karting, according to the manufacturer. We take a quick look around the helmet and give you our thoughts. First Impressions We think Bell have done a good job in the looks department with this helmet. It's much more aggressive than we have previously seen. Using an outer shell which is very similar to the Bell HP7 which is used by many Formula One drivers means the form factor has instant credibility. The Helmet is rated as Snell K2010 which means it is only certified for use in karting. This also means that the moldings designed to seat the Hans posts at the rear of the helmet are blanked off. The helmet is available in the SA2010 specification which can be used for car racing. The model name for this model is the RS7-Pro. General Use/Observations The visor on this helmet is much easier to operate than previous helmets we have used, in particular the Bell Sport series. It's unique shape allows you to open the visor much more easily when wearing gloves. We still think Arai's mechanism for the visor is easier to operate, mind you. Something that we did notice, is the sheer number of vent holes on the helmet. This is because karting, in comparison to full circuit racing, has a relatively low average speed. This can mean the helmet steams up until you reach the main straight or when you have a head wind. Not pictured, is the rear spoiler which is a thin piece of polycarbonate and at £68 is a rip off. I'm not going to try and defend Bell on this as they realise this is a very desirable item and charge top whack for it. Having had experience with the simple process of making a mould and manufacturing polycarbonate items, I would love to hear Bell's justification for such a price tag. We were unable to find a pattern part spoiler for this particular Bell helmet. You can find these on ebay for Arai helmets and various other brands for just £25. If you find one, please use the comments section to point people in the right direction. General build quality is good although there was some faint orange peel effect on the clear coat of this helmet. This could be limited to a few helmets or may be a sign of the painting process being changed. I have to stress that this is not an issue and purely an up close observation compared to the Sport 4 I had sitting next to this helmet. The helmet is comfortable, but feels smaller than the Sport series. We will update the review once the helmet has worn in a little. The aperture of this helmet is short! It actually has a wider aperture than the Sport series but much shorter in height. The large Bell visor sticker which comes supplied with this helmet leaves you feeling quite detached from the outside world. The neck strap on the helmet is now all black, which is much better than the older yellow straps which had a tendency to show up dirt. One more comparison to the Sport 4 is the RS7's outer shell size. It is noticeably smaller even though it's the same size fit of helmet (57cm - Small) It's also around 150g lighter coming in at around 1450g. Summary A solid, modern, karting specific helmet which won't break the bank. UPDATE 18/03/2015: So I finally got round to using the helmet at Shenington in KZ. My sport 4 visor kept flying open on the straight and if I closed it fully, would steam up resulting in no visibility! This was pretty scary so I decided to use the new lid. I could not get the visor to steam up even if I tried! The helmet seems to withdraw the vapour away from the visor very well and there was no hint of any steaming up on the visor. The vent holes meant the helmet was a little colder than normal but this was on a particularly cold day and was not uncomfortable. Pros Excellent form factor Good ventilation for slow speed Improved visor system Good Value Cons Expensive accessories (Spoiler & Visors)
